It’s the start of Intune and today we are going over the prerequisites that you must check during initial setup of Intune according to your environment, You may be in a windows environment, iOS, android, macOS or maybe all together. We are going over each and every step that you must do if you are starting your journey with Intune.
1. Intune license
Starting off with the License. To use Intune, we need Intune license first and I assume you already have one, but just for the sake of this blog, I’ll explain. In order to proceed, we need to have an Intune license in the environment, for both BYOD and corporate enrollments as well. In your office 365 admin center you do need to purchase any one of these following;
(To Begin with Intune we recommend M365 business premium) as this has all office apps and Intune license, plus this is the starter package when it comes to Intune.
- Microsoft 365 E5
- Microsoft 365 E3
- Enterprise Mobility + Security E5
- Enterprise Mobility + Security E3
- Microsoft 365 Business Premium
- Microsoft 365 F1
- Microsoft 365 F3
- Microsoft 365 Government G5
- Microsoft 365 Government G3
- Intune for Education
2. Assign a license to users
Once you have the Intune license purchased then you have to assign the Intune licenses to your user whom you want to enroll in Intune. Assign an Intune license to the admin account as well as who is going to manage the account. You also can set up a non-Intune license admin to access and manage Intune.
3. Allow or Block the enrollment of Specific OS – Enrollment Restrictions
Depending on your need, you can block some Operating systems to stop those systems from getting enrolled in Intune. Or you can allow the Operating system but block BYOD enrollments of some or all OS. For example, if you don’t want android enrollments in your environment, simply you can block from here.
- To completely block any specific OS, Go to Devices > Enroll Devices > Enrollment device platform restrictions
- Click on All users under Device type restrictions
- Click On properties and click Edit beside the platform setting
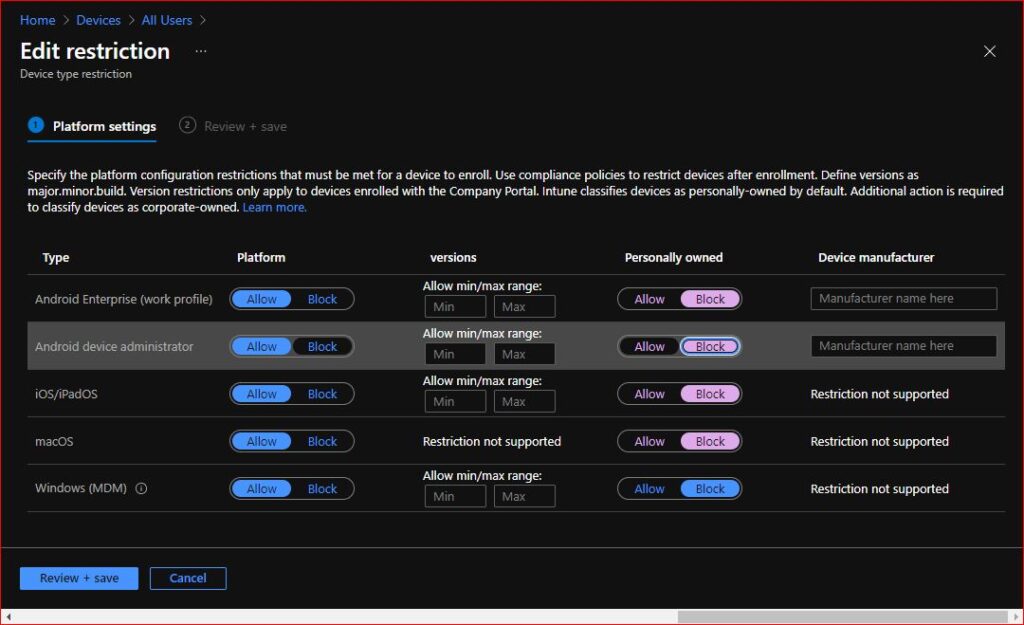
Here you can allow or block the Operating system. If you want to allow specific groups to enroll their personally owned devices, you can create a new profile and make the changes you need. The new profile then will take precedence over the default.
4. Configure Intune for Windows devices
In order to enroll windows devices in intune, we have to set MDM to Intune. If you are coming from O365 MDM change the MDM authority to Intune. To check MDM authority, Go to Tenant administration and check the MDM authority. Mine is set to Inunte already.
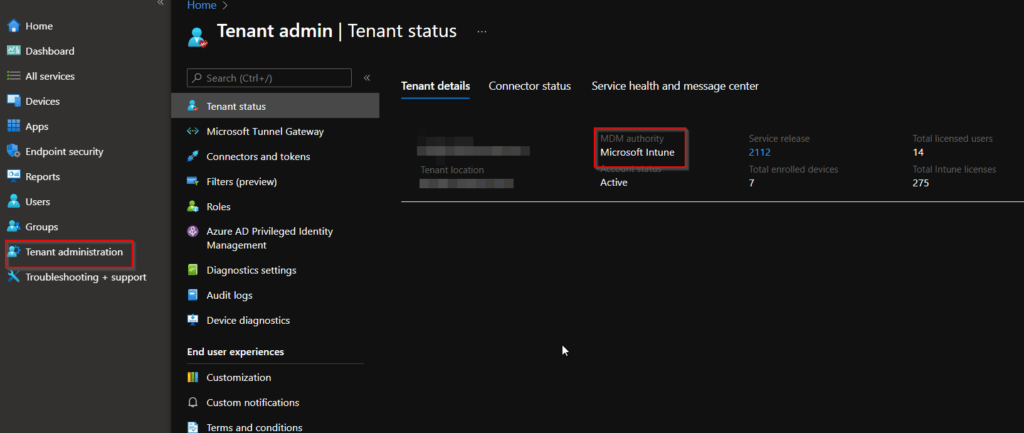
Once it’s changed, we have to verify if Intune is ready to enroll windows devices or not.
To check that setting, Go to Devices > Enroll devices > Windows enrollment > Automatic Enrollment
Here you have to set the toggle button to either Some and target the groups or set it to all.
If you set to Some and select only some groups only those users will be able to enroll in intune. On the contrary, if you set to all, every single Intune licensed user can enroll in intune if they have a Valid Intune license assigned. Once it’s set up you can now start the Windows enrollment.
5. Configure Intune for iOS/iPad and macOS devices
When it comes to Apple devices, being a third party it has to collaborate with Intune needs some kind of trust certificate. That’s exactly what the MDM push certificate does. MDM push certificate allow Intune to manage Apple devices. In order to set up Go to Devices > iOS/iPadOS > iOS/iPadOS enrollment
Click on the Apple MDM push certificate and here you have to create the MDM push certificate.
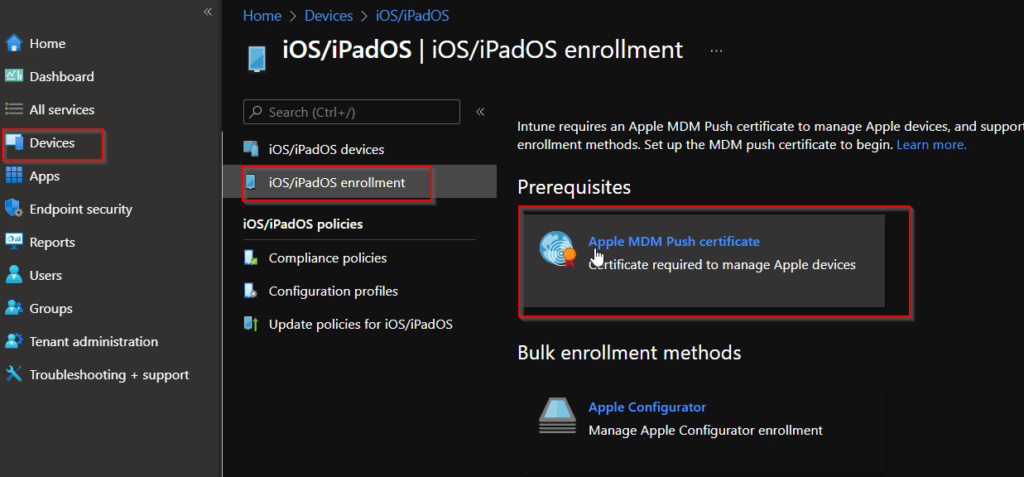
Once it’s created your environment is ready to roll the enrollment! Another important thing to take care of in the Apple Push MDM certificate is:
Apple push notification service certificate expiration in intune
Yes, an Apple certificate expires after a year from the moment its created. So companies have to renew this every single year.
But what if we don’t?
If you don’t then all of your Apple devices will be disconnected from the Intune and you have to re-enroll all of your devices from scratch. Also, create the MDM certificate with a generic company’s account because in case an employee uses his/her login ID and then he/she leaves then you will be dealing with a big mess of enrolling all of your apple devices from scratch.
6. Configure Intune for Android devices.
Similar to Apple, as Android is another third-party company that also has to collaborate with Intune, it needs a trusted certificate so Intune can manage Android devices. To set-up this certificate, go to Devices > Android > Android enrollment > Managed Google Play
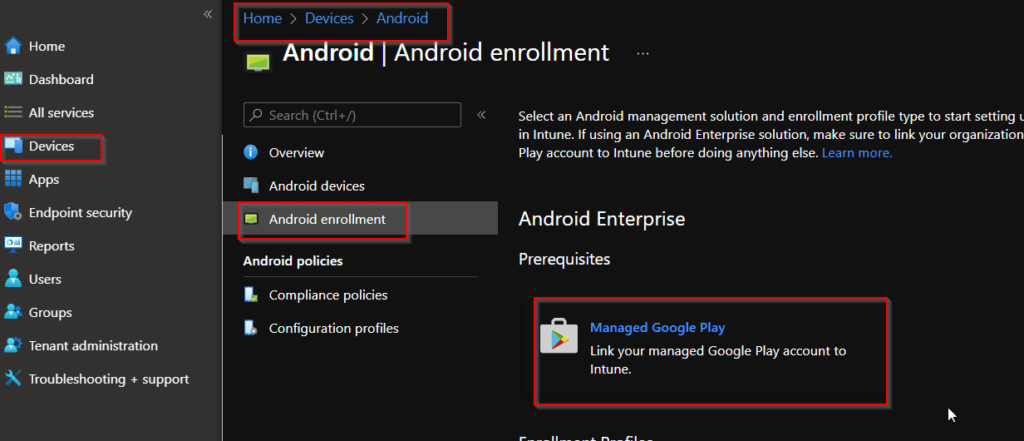
Here you have to link a google play account which will be used to allow android enrollments and push android applications from Intune via the google play store.
Unlike the apple MDM push certificate, this doesn’t need to be renewed and you can enroll devices Forgetting the renewed date or time.
7. Enrollments
Last but not least, once everything is configured you may start the enrollment depending on the platform and type of enrollment you need.
- Enroll your windows device to Intune
- Enroll your Ios/iPad device to Intune
- Enroll your Android device to Intune
- Enroll your MAC devices to Intune
There are definitely more than that, such as assigning compliance policy or assigning configuration profiles but just to kick start the setup the discussed things are must to configure and these are all basics that need to be checked prior to doing anything in Intune and I hope this blog may help you a little to figure out when we start Intune and if it does help, make sure to subscribe to our newsletter so you will get our brand new articles directly to your email.
